You have a stack of handwritten notes, a letter, or a multi-page document, and you want the text in Google Docs so you can search it, edit it and share it. Google offers four routes (Drive, Keep, Lens and Workspace add-ons) and they’re all free. The question isn’t whether they work; it’s how well they work on your handwriting.
Here’s the honest answer: Google’s OCR is good at printed text and acceptable at neat block-letter handwriting. On normal cursive it drops to around 40% to 60% word accuracy, which means a typical page comes back with dozens of broken words, garbled proper names and missing lines. This guide walks through every Google route, with real accuracy numbers, then covers what to do when the free tools aren’t accurate enough.
Quick takeaways
- Google Docs has no built-in handwriting OCR. The “OCR” happens in Drive when you open an image or PDF with Google Docs, and it uses Google’s general OCR engine.
- Accuracy is fine on clean printed handwriting (80% to 90%) but typically drops to 40% to 60% on cursive and below 30% on historical or messy scripts.
- Google Keep, Lens and most Workspace OCR add-ons all use the same underlying engine, so switching between them rarely improves accuracy: it just changes the workflow.
- File limits matter: Drive OCR caps at 2 MB images and 10-page PDFs. Beyond that, output is silently truncated.
- For cursive or any handwriting that matters, a dedicated handwriting OCR returns 95%+ on the same input and exports to Word, PDF or plain text in one click.
Quick decider: which Google tool fits your situation
| You have | Recommended path | Realistic accuracy | When it works |
|---|---|---|---|
| Neat printed handwriting (image or short PDF) | Google Drive → “Open with Google Docs” | 80% to 90% | Block letters, dark ink, good lighting |
| Quick photo of a note on your phone | Google Keep → “Grab image text” | 70% to 90% on print, 40% to 60% on cursive | One image at a time, no PDFs |
| Snippet you want to copy from a picture | Google Lens (Photos / mobile) | 70% to 90% on print | Short bursts, copy-paste workflow |
| You’re working inside Docs and don’t want to leave | A Workspace Marketplace OCR add-on | Same as Drive | Convenience, not accuracy |
| Cursive handwriting (any era) | A dedicated handwriting OCR | 95%+ on legible cursive, 70% to 90% on historical | Real letters, journals, multi-page archives |
| Foreign-language handwriting | A dedicated handwriting OCR with translation | 95%+ on cursive, plus a Translate step | German wartime letters, Spanish family journals |
| 50+ page handwritten archive | A dedicated handwriting OCR | 95%+ | Batch upload, single export |
Google’s built-in OCR options
Google has OCR in three products you probably already use, plus the Workspace Marketplace. Each one has the same underlying engine but a different workflow.
1. Google Drive: “Open with Google Docs”
Google Drive can OCR an image or PDF and open the result as a Google Doc.

Step by step:
- Upload the file. Drag and drop the JPG, PNG or PDF into Google Drive, or use New > File Upload. Make sure the image is right-side up. A quick rotate or contrast bump beforehand often improves the OCR result.
- Right-click > Open with > Google Docs. Google runs OCR and creates a new Google Doc.
- Use the result. The new doc contains the original image at the top and the extracted text below. The text is editable and exportable like any other Google Doc.
What it’s good at: Free, no installation, completely inside the Google ecosystem. Handles both images and PDFs (up to 10 pages). Preserves basic formatting in many cases.
What it isn’t good at: Cursive handwriting. The engine was built for printed text and treats connected letters as noise. Expect 40% to 60% accuracy on everyday cursive and below 30% on faded historical writing. File limits also bite: images larger than 2 MB and PDFs longer than 10 pages are silently truncated.
2. Google Keep: “Grab image text”
Google Keep has a built-in OCR command called Grab image text that’s handy for one-off notes from your phone.

Step by step:
- Add the image to a Keep note. On web, use New note with image; on mobile, snap a photo or pick an existing image.
- Open the three-dot menu and pick “Grab image text”. Keep extracts text and pastes it into the note below the image.
- Send to Docs. From the same three-dot menu, Copy to Google Docs creates a new doc with the text already in it.
Strengths: Mobile-friendly, no separate upload step, free, and the “Copy to Google Docs” shortcut saves you the manual paste. Works on JPG, PNG, GIF and WebP up to 10 MB.
Limits: No PDF support. One image at a time. Plain-text output only, so any structure (columns, headings, indentation) is lost. Accuracy on cursive matches Drive: around 40% to 60%.
For a deeper walkthrough of the Keep flow, see how to convert handwriting to text in Google Keep.
3. Google Lens (and Google Photos)
Google Lens is the engine behind Google Photos’ text-recognition prompts and works on the fly from a phone camera or web photo.
On mobile: Open the photo in Google Photos, tap the Lens icon, and pick Copy text when it appears. Paste into Google Docs.
On desktop: Open the image at photos.google.com. If the Copy text from image prompt doesn’t surface automatically, right-click the image in Chrome and choose Search image with Google, then switch to the Text tab in the Lens sidebar.
Where Lens shines: Quick, ad-hoc captures. Pointing your phone at a recipe card and copying the ingredients to a doc. It supports many languages and handles mixed print plus cursive better than Drive in some cases.
Where it falls short: No batch mode. Each page is a separate copy-paste cycle. Connected cursive and faded historical writing still produce errors. Long documents are tedious.
4. Google Workspace Marketplace OCR add-ons
Search the Marketplace for “OCR” or “image to text” and you’ll see dozens of add-ons promising in-Docs OCR.

The truth about most of them: they call Google’s own OCR engine in the background and wrap it in a Docs sidebar. The convenience is real (you can stay inside the document); the accuracy improvement on handwriting is not. If Google Drive OCR can’t read your cursive, neither can the typical add-on.
The exceptions are a handful of paid add-ons that use independent OCR engines. For handwriting specifically, those independent engines are still tuned for printed text. The reliable accuracy gains come from tools purpose-built for handwriting, not from add-ons sitting inside Docs.
What Google’s OCR actually returns on cursive: a real example
Here is the result of opening a clear, legible 1989 handwritten letter directly with Google Docs.
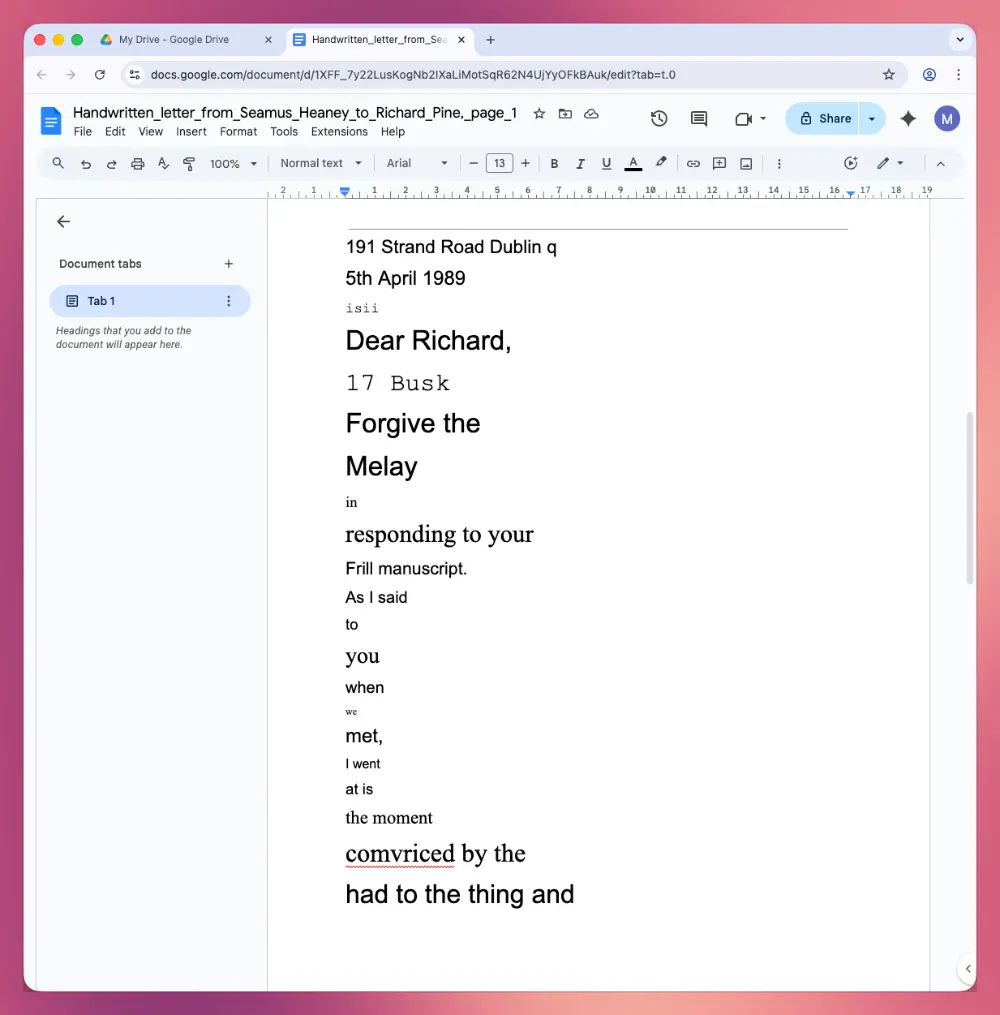
The first few lines of the output:
191 Strand Road Dublin q 5th April 1989 isii Dear Richard, 17 Busk Forgive the Melay in responding to your Frill manuscript.
Things to notice:
- Proper nouns broken or invented. “Dublin 9” became “Dublin q”. The letter writer’s name became “17 Busk”.
- Common words substituted. “delay” became “Melay”. “Full” became “Frill”.
- Line structure collapsed. Lines fragmented mid-sentence. Sentence boundaries lost.
- Whole phrases dropped. Some sections are simply missing.
A human reader handles this letter without trouble. Google’s OCR returns something that requires a complete rewrite, not a proofread.
When to use a dedicated handwriting OCR instead
Dedicated handwriting OCR services are trained specifically on handwriting (cursive, print, mixed, historical) rather than retrofitting an engine designed for typeset text. The accuracy difference on the same letter above is roughly 96% versus 45%.
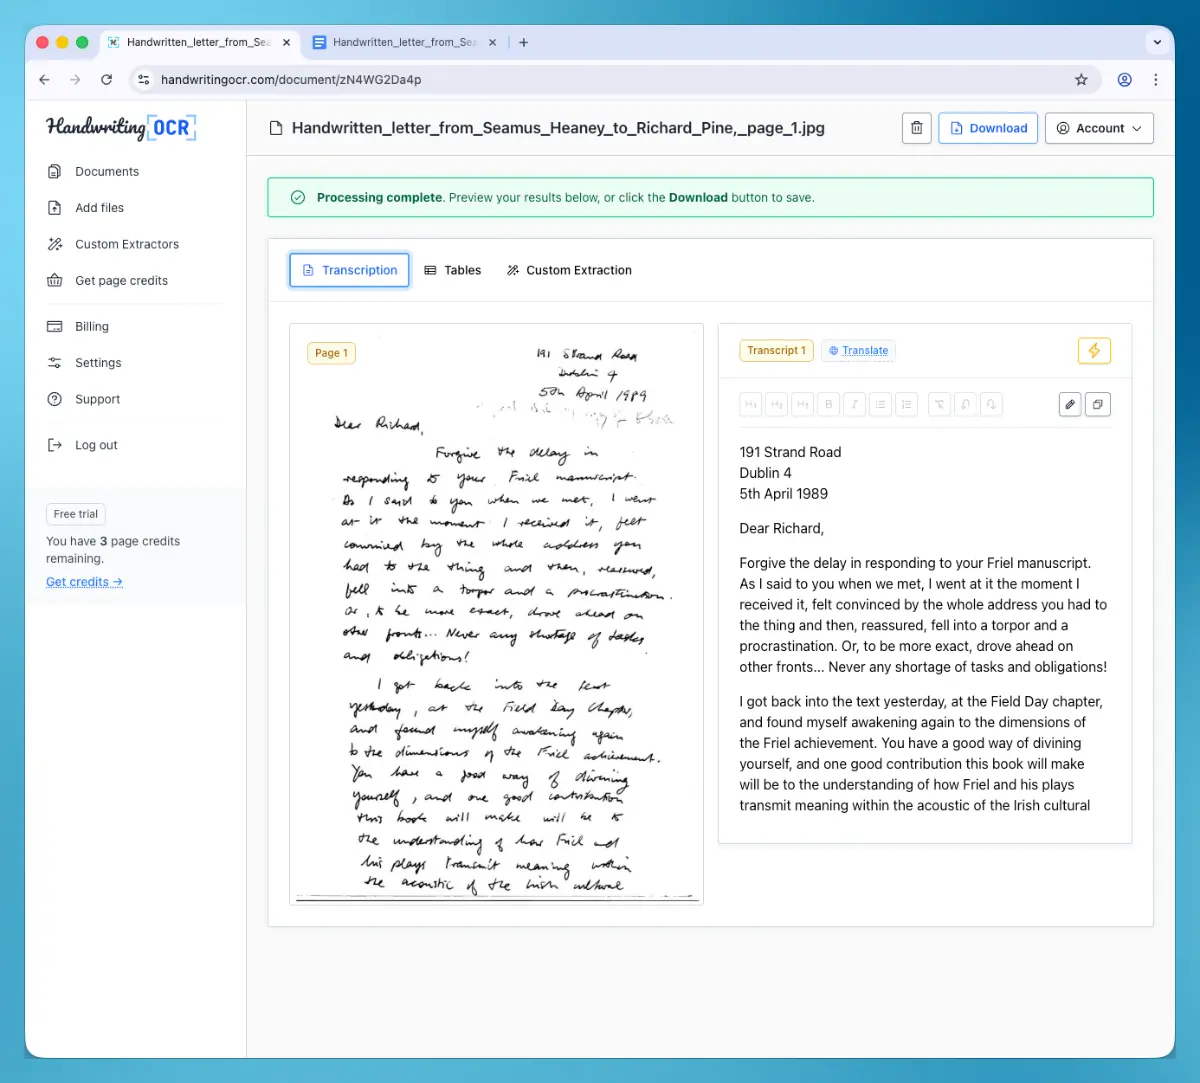
A practical workflow that’s free to try:
- Upload your handwritten image or PDF to Handwriting OCR. Free trial credits, no card required.
- Pick Extract full text as the action.
- Wait 15 to 30 seconds per page.
- Download as Word, PDF or plain text, or copy the text and paste it into Google Docs.
You stay inside the Google ecosystem for everything except the OCR step itself, and you sidestep the typical 30 to 60 minutes of manual correction.
Where this matters most:
- Cursive handwriting, where Google’s OCR drops to 40% to 60%.
- Historical letters, where ink fade and script style compound the problem.
- Multi-page archives (more than 10 pages), where Drive truncates and Keep can’t help.
- Foreign-language handwriting, where you also need translation in the same pass.
- Names, dates and proper nouns, which Google’s OCR substitutes more often than it admits.
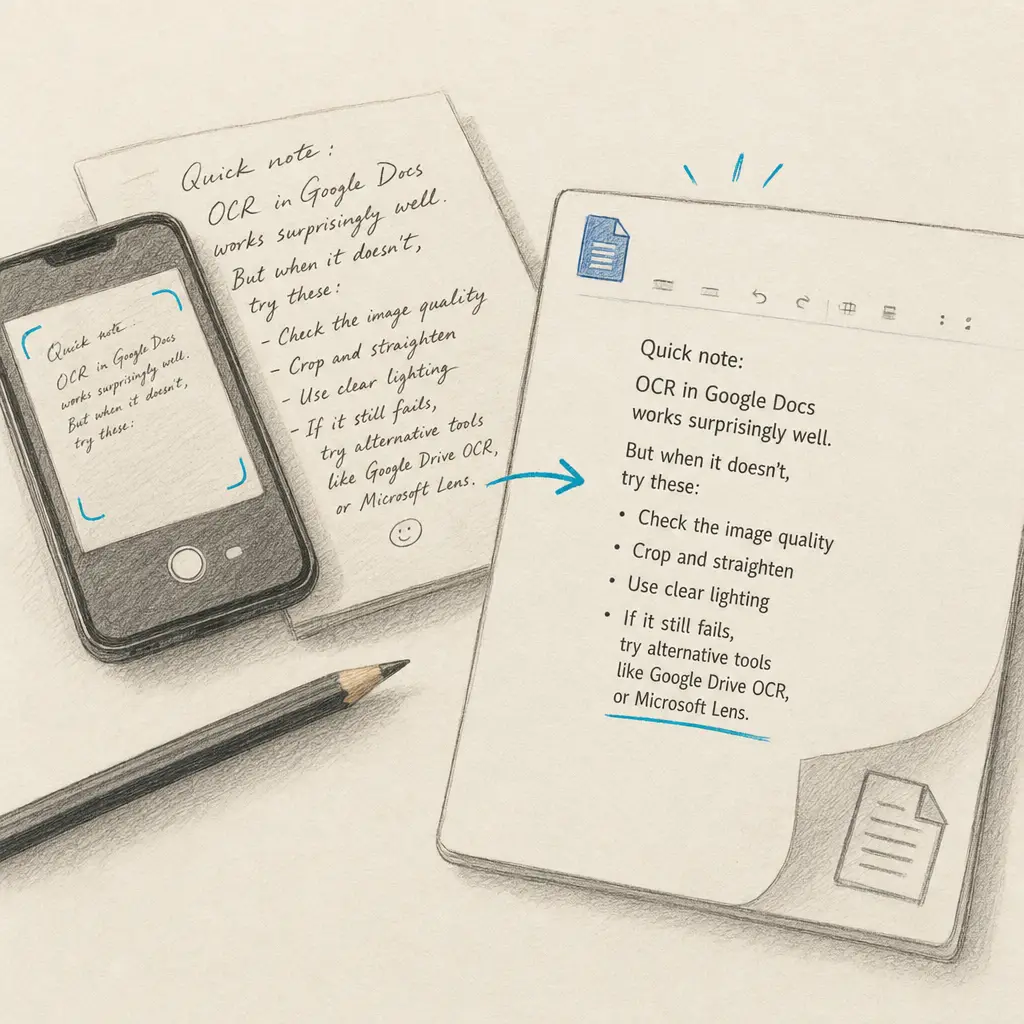
Tips that improve accuracy in any tool
These apply whether you use Google’s OCR or a dedicated tool. They’re worth a minute of preparation because they often turn a marginal scan into a clean one.
- Light the page evenly. Natural daylight or a single lamp at a low angle. Avoid direct overhead light on glossy paper (causes glare).
- Hold the camera parallel to the page. A square photo OCRs much better than an angled one. Phone document-scanner modes do this perspective correction automatically.
- Use dark ink on light paper. High contrast helps every OCR engine. Pencil or faded ink can drop accuracy 10 to 20 percentage points.
- Keep the resolution above 300 DPI on scans. Higher is better; lower starves the model of detail.
- Split long PDFs. Google Drive caps at 10 pages. Even outside Google, splitting reduces the chance of a partial-failure run.
- Print is easier than cursive. If you’re taking notes for future OCR, write in block letters. It’s the single biggest accuracy win you can make at capture time.
- Proofread proper nouns specifically. OCR errors cluster around names, dates and unfamiliar words. Scan-edit those first.
Bottom line
For occasional, neatly-printed handwriting, Google Drive’s “Open with Google Docs” is the simplest free path and the answer is genuinely good. For cursive, multi-page archives, foreign-language documents, or anything where you can’t afford a 40% to 60% error rate, the right tool is a dedicated handwriting OCR run alongside Google Docs.
Try Handwriting OCR free (no card required) on a single page of your hardest sample. If the output matches what you can read by eye, the same will hold for the rest of the archive. If you have specific questions about a tricky document or a large batch, get in touch with a sample and we’ll tell you what to expect before you start.
Frequently asked questions
Does Google Docs have a built-in OCR for handwriting?
Google Docs does not have a dedicated handwriting OCR feature, but Google Drive can OCR an image or PDF and open the result as a Google Doc. The conversion uses Google's general-purpose OCR engine, which was built for printed text. Accuracy on neat printed handwriting is usually acceptable; accuracy on cursive or messy handwriting typically falls below 50% and the document needs significant manual correction.
How do I convert a handwritten image to a Google Doc?
Upload the image (JPG, PNG or PDF) to Google Drive, right-click the file and choose "Open with > Google Docs". Google runs OCR on the file and opens a new Google Doc containing the original image at the top and the extracted text below it. The text is editable and can be shared, exported or copied like any other Google Doc. Files larger than 2 MB or PDFs longer than 10 pages may not process fully.
How accurate is Google Docs OCR on handwriting?
On clean printed handwriting (block letters, neat ballpoint on white paper), Google Docs OCR commonly returns 80% to 90% word accuracy. On everyday cursive, accuracy drops to 40% to 60%. On historical scripts or messy hands, accuracy can drop below 30%, with whole words skipped or substituted (a 1989 letter we tested produced "Melay" in place of "delay" and corrupted most proper nouns). For anything beyond neat print, a dedicated handwriting OCR tool returns 95%+ on the same input.
Can Google Keep convert handwriting to text?
Yes, via the Grab Image Text feature. Add a photo to a Keep note, open the three-dot menu and pick "Grab image text". Keep then uses Google's OCR to extract text and pastes it into the note below the image. From there, "Copy to Google Docs" sends the text to a new doc. Keep handles one image at a time, no PDFs, and accuracy on cursive is the same as the rest of Google's OCR (around 40% to 60%).
Can Google Lens read handwriting?
Yes, for short snippets. Google Lens, available inside Google Photos and the Google mobile app, can identify text in a photo and offer a Copy text option. It works well for neat printed notes and signs and adequately on light cursive. For multi-page handwritten documents, Lens is inefficient because each page must be processed and copy-pasted individually. There is no batch mode.
How do I convert cursive handwriting to a Google Doc?
Google's own OCR (Drive, Docs, Keep, Lens) struggles with cursive, typically scoring 40% to 60% word accuracy. The practical workflow is: run cursive through a dedicated handwriting OCR service that handles connected letterforms, then paste the resulting text into Google Docs. Handwriting OCR returns 95% or better on legible modern cursive and offers free trial credits with no card required.
What size and file format limits apply to Google Drive OCR?
Google Drive OCR accepts JPG, PNG, GIF and PDF files. Images should be under 2 MB for reliable processing. PDFs are processed only for the first 10 pages. Text should be at least 10 pixels tall. Files that exceed these limits silently return incomplete output, so check the extracted text against the original before relying on it.
Is there a Google Docs OCR add-on that handles handwriting better?
Most Google Workspace Marketplace OCR add-ons call Google's own OCR engine behind the scenes, so they do not improve accuracy on handwriting. They add convenience (running OCR inside the doc instead of going via Drive) but not raw accuracy. A handful of paid add-ons do use independent OCR engines; for handwriting specifically, the reliable pattern is to run a dedicated handwriting OCR service first and then paste into Docs.
Can I OCR a handwritten PDF in Google Drive?
Yes, for the first 10 pages. Right-click the PDF in Drive and choose "Open with > Google Docs". Drive extracts text from each page and creates a Google Doc. Accuracy on handwritten PDFs follows the same pattern as images: acceptable on neat print, weak on cursive. For handwritten PDFs longer than 10 pages, split the PDF first or use a dedicated handwriting OCR tool that handles multi-page documents.
How does Google's handwriting OCR compare to dedicated tools?
Google's tools are free, integrated and instant, but were built for printed text. On printed text they perform well. On handwriting, accuracy ranges from 80%+ (neat block letters) down to 30% to 50% (cursive, faded ink, historical scripts). Dedicated handwriting OCR services routinely score 95% or higher on legible cursive and 70% to 90% on historical scripts, with batch processing and direct exports to Word and PDF. For anything more than a casual one-page note, the time saved on manual correction outweighs the small per-page cost.